The kids started school today. The school requires us to send them with a zip baggie full of earthquake supplies. I thought I'd be cute and make them a zipped bag out of some left over oil cloth.
Well the girls loved their little bags! They loved them so much that when they left school - without their new bags - it was the biggest meltdown I think they've ever thrown. The teachers actually came out of their class rooms to see what was happening!
They were so far gone into tantrum mode that I had to give them a cookie to get them to stop (something I never do)!
Great idea, Momma!
About Me

- It's In the Bag
- California, United States
- Making things that are fun, good for your family and good for the environment. Please support Micro-businesses.
Monday, August 27, 2012
Tuesday, August 21, 2012
Giveaway!
**************************This Contest is now closed***********************************
I LOVE this cape!

I know, I say that about every new thing I make. But this one makes me extra happy. I don't know if it's the contrasting colors, the super cool reflector, or the authentic Police Officer patch - but I really enjoy this one.
What's the giveaway?
As a celebration of being happy I'm going to be giving this Police Officer cape away!!
This should fit between a 3 year old & 6 year old - but I've seen several adults wearing them. The neck is plenty big, the difference will be in the length. This sweetie is about 43" tall.
*********************************************************************************
As a post script today, with still only 1 follower & zero views today, if you're worried about it - I can't see your email address when you become a follower and neither can anyone else! And, as of now, I haven't figured out how to even send an email to my 1 follower to say thanks.
I have neither the intention, nor time, nor technical know how to spam anyone, share any one's personal info or proselytize. I'm just trying to build my readership.
I LOVE this cape!

What's the giveaway?
As a celebration of being happy I'm going to be giving this Police Officer cape away!!
What are the rules?
Become a follower on my blog and I'll choose a winner from my followers on September 15, 2012. Contest will end @ 11 pm PT. Open to US residents only.
 |
| Reflector |
 |
| Cool patch |
 |
| Cool kid |
*********************************************************************************
As a post script today, with still only 1 follower & zero views today, if you're worried about it - I can't see your email address when you become a follower and neither can anyone else! And, as of now, I haven't figured out how to even send an email to my 1 follower to say thanks.
I have neither the intention, nor time, nor technical know how to spam anyone, share any one's personal info or proselytize. I'm just trying to build my readership.
Friday, August 17, 2012
Green Tomato Relish
My beautiful heirloom cherry tomato bush gave us a tremendous harvest this summer, but the season is over and the bush needed to be cut way down (I'm going to leave it in it's pot to see if it comes back next year).
So what do I do with all these green tomatoes? How about making and canning green tomato relish! (I've heard it is also called Chow Chow)

The recipe calls for bell peppers - which I can't stand. I left the peppers out of my recipe and it's great, but feel free to add them if you so choose.


So what do I do with all these green tomatoes? How about making and canning green tomato relish! (I've heard it is also called Chow Chow)

The recipe calls for bell peppers - which I can't stand. I left the peppers out of my recipe and it's great, but feel free to add them if you so choose.
I had about 6 cups of heirloom green cherry tomatoes (using a liquid measuring cup).
2 green bell peppers - seeded & cored
1 red bell pepper - seeded & cored
1 large sweet yellow onion
1 Tablespoon mixed pickling spices
1 Tablespoon celery seed
1 - 2 cups apple cider vinegar (depending on the quantity of tomatoes you use - start with 1 cup & taste. Add more if needed)
2 cups granulated sugar (I used ORGANIC sugar)
1.5 Tablespoons canning/pickling salt
This recipe yielded 5 - 8 oz jars.
Chop the tomatoes & peppers finely. (Since I have twin toddlers there was no way I was going to chop all those tomatoes. I put them in the food processor, in small batches, and it worked great!)

Dice onion. Put veggies in a large pot, add spices, salt, sugar & vinegar. Stir well and bring to a simmer over medium heat. Simmer, stirring frequently, until relish cooks down & thickens. This should take about an hour & a half. Place hot relish in prepared jars.

Here are the instructions for water bath canning - straight from Granite-Ware's instruction manual, using a Granite Ware canner and jar rack:
Thoroughly wash lids, bands, and jars in hot sudsy water, rinse. Dry bands. Heat jars and lids in hot water [in the canning pot] prior to filling.

Fill hot jars with prepared recipe. Leave recommended headspace according to recipe [about 1/4" from top].
Wipe jar rims with a clean damp cloth. Position heated lid on jar with screw band.
Place each jar onto canner rack, prior to water reaching a boil, and lower rack. Water should be 1 to 2 inches over jar tops. Add additional hot water if needed. Cover canner. Start timing when water begins to boil [boil for about 10 minutes].
After processing, lift rack and hook over rim. Remove jars from canner with your jar lifter. Do not carry jars in canner rack Set jars on a towel to cool for 12 to 24 hours.
When jars are cool, test for a seal by pressing down on center of lid. If lid center does not flex up and down the lid is sealed. Store in a cool, dry, dark place.

Whew!
So, why am I posting a recipe for relish on my sewing blog? Look what I did with all the scraps of fabric and miles of ribbon I have!

I am also currently canning this summer's fruit harvest for Christmas gifts. I've already bought the Holiday fabric.

If you're not into spending all day in a hot kitchen this summer, why not fill a Ball jar with Epsom salt & add some flowers from your lavender bush (make sure you've dried them first) to make a relaxing salt bath gift.
Thursday, August 9, 2012
Capes!
For a while now I have been on a hunt for dress-up clothes for my girls. The problems? Dress up clothes from a target-like store are cheaply made (in China), lack originality and are extremely expensive (especially when you consider the aforementioned)!
Clothes from a thrift store always require me to do *something* to them to make them even remotely fun for the girls to wear and, again, are too expensive for something coming from a "thrift" store.
I've made tutus for them. Any of you moms out there with tutus in your kids' closets know that they take up a ton of room!
So I decided to start making them capes! Not just super-hero capes, but capes that allow their imaginations to soar!
These capes are fantastically fun, open the door for all kinds of imaginative play (which I have read is a very important activity in early childhood development), are unique, wash easily, are made in the USA and - my favorite part - fold up into a little square and go neatly into a drawer or bag!
Round 1: "Pig" and "Cow" farm animals


The girls NEVER take these off. They have so much fun - and it's so easy for me to bring these capes along with us wherever we go! These are totally gender neutral dress ups so they can play with other girls or boys!

 |
| I love the piggy tail! |


Round 2: Firefighter/Police Officer

It's hard enough getting a toddler to hold still for a picture; but a tot in a firefighter cape? forget about it!! She's definitely on the move...
 |
| Yes, that's a real reflector! |

If you're interested in purchasing please see the "Buy" button on the right side of the blog. If you live close by me (you know who you are) and want to save the shipping charges just shoot me an email.
Friday, August 3, 2012
Back to School Already?!
Well, it's almost time for school to begin! In an effort to be as "green" as possible I have created some bags for the girls' school lunches. No more single-use plastic baggies!
 The larger bag is about the size of a 1 quart Ziploc baggie, and the smaller is about half that size. Both are made from 100% organic cotton. It's the only thing I feel comfortable putting the girls' food in (and I LOVE the Lorax fabric).

The bigger baggie is perfect for crackers, pita chips, grapes, those baked peas from TJ's, pretzels.... I think the smaller bag will be great for trail mix, raisins, or smaller portions of the other goodies.

These are machine washable, but will shrink a bit in the dryer. I just give them a quick hand wash in the sink & let them air dry overnight.
Wednesday, August 1, 2012
A Jacks Bag, A Snacks Bag
an any this or that bag.
If you have kids then you probably have lots of little "things" everywhere.
One of my kids' friends got them each a bag of jacks. Instead of waiting for all of the little jacks to end up everywhere throughout my house I decided to make a bag for them.


If you have kids then you probably have lots of little "things" everywhere.
One of my kids' friends got them each a bag of jacks. Instead of waiting for all of the little jacks to end up everywhere throughout my house I decided to make a bag for them.

The kids love the bags (they can differentiate whose are whose by the bag), they are easy to open & close, and I love that the little pieces end up back in the bags - not all over the floor!
I made one for my girlfriend's kid and she said she uses the bags for snacks. Easy enough to clean up, not a wasteful single use bag, and doesn't take up as much space as a plastic container! Yay!

This one I made with outdoor material so it can stay - well - outdoors. It has their many, many pieces of sidewalk chalk in it.
This fabric will become one for a birthday gift for one of the girls' friends. He can put his Lego pieces in it - and bring them with him to a playdate!

Ok, here goes....
This is my first attempt at blogging, and to be honest, I'm not sure what I'm doing! But I wanted to showcase some of the fun things I've been tinkering with. I hope it works.
A few years ago my kids' teacher inspired me to get sewing when she showed the class the fabric Christmas bags she's been making for her family for years.
Since then my dear friend Melissa has so patiently tutored me through buying the right sewing machine, explaining sewing terminology, convincing me to read the instruction manuals and basic, regular middle of the night advice (check out her amazing work at http://lundendesigns.com/blog/).
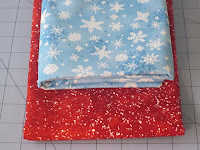
So.... this is an iPad bag for my Stepmother.


I gave the outer fabric a thick interfacing both for form and for protection for her iPad.
As always, I've made the strap long enough so you can carry it messenger style across your shoulder. I love this technique because I always need my hands free for other things.
I hope she likes it!
A few years ago my kids' teacher inspired me to get sewing when she showed the class the fabric Christmas bags she's been making for her family for years.
Since then my dear friend Melissa has so patiently tutored me through buying the right sewing machine, explaining sewing terminology, convincing me to read the instruction manuals and basic, regular middle of the night advice (check out her amazing work at http://lundendesigns.com/blog/).
So.... this is an iPad bag for my Stepmother.

I love these fabrics together! It's fun & fresh, yet mature enough for an adult. 
I gave the outer fabric a thick interfacing both for form and for protection for her iPad.
As always, I've made the strap long enough so you can carry it messenger style across your shoulder. I love this technique because I always need my hands free for other things.
I hope she likes it!
Subscribe to:
Posts (Atom)